
















Settings tour
All settings live on one page, EU Legal Guarantee and GARAN, opened with Configure in the Module Manager. This chapter walks through it section by section.
The settings page at a glance
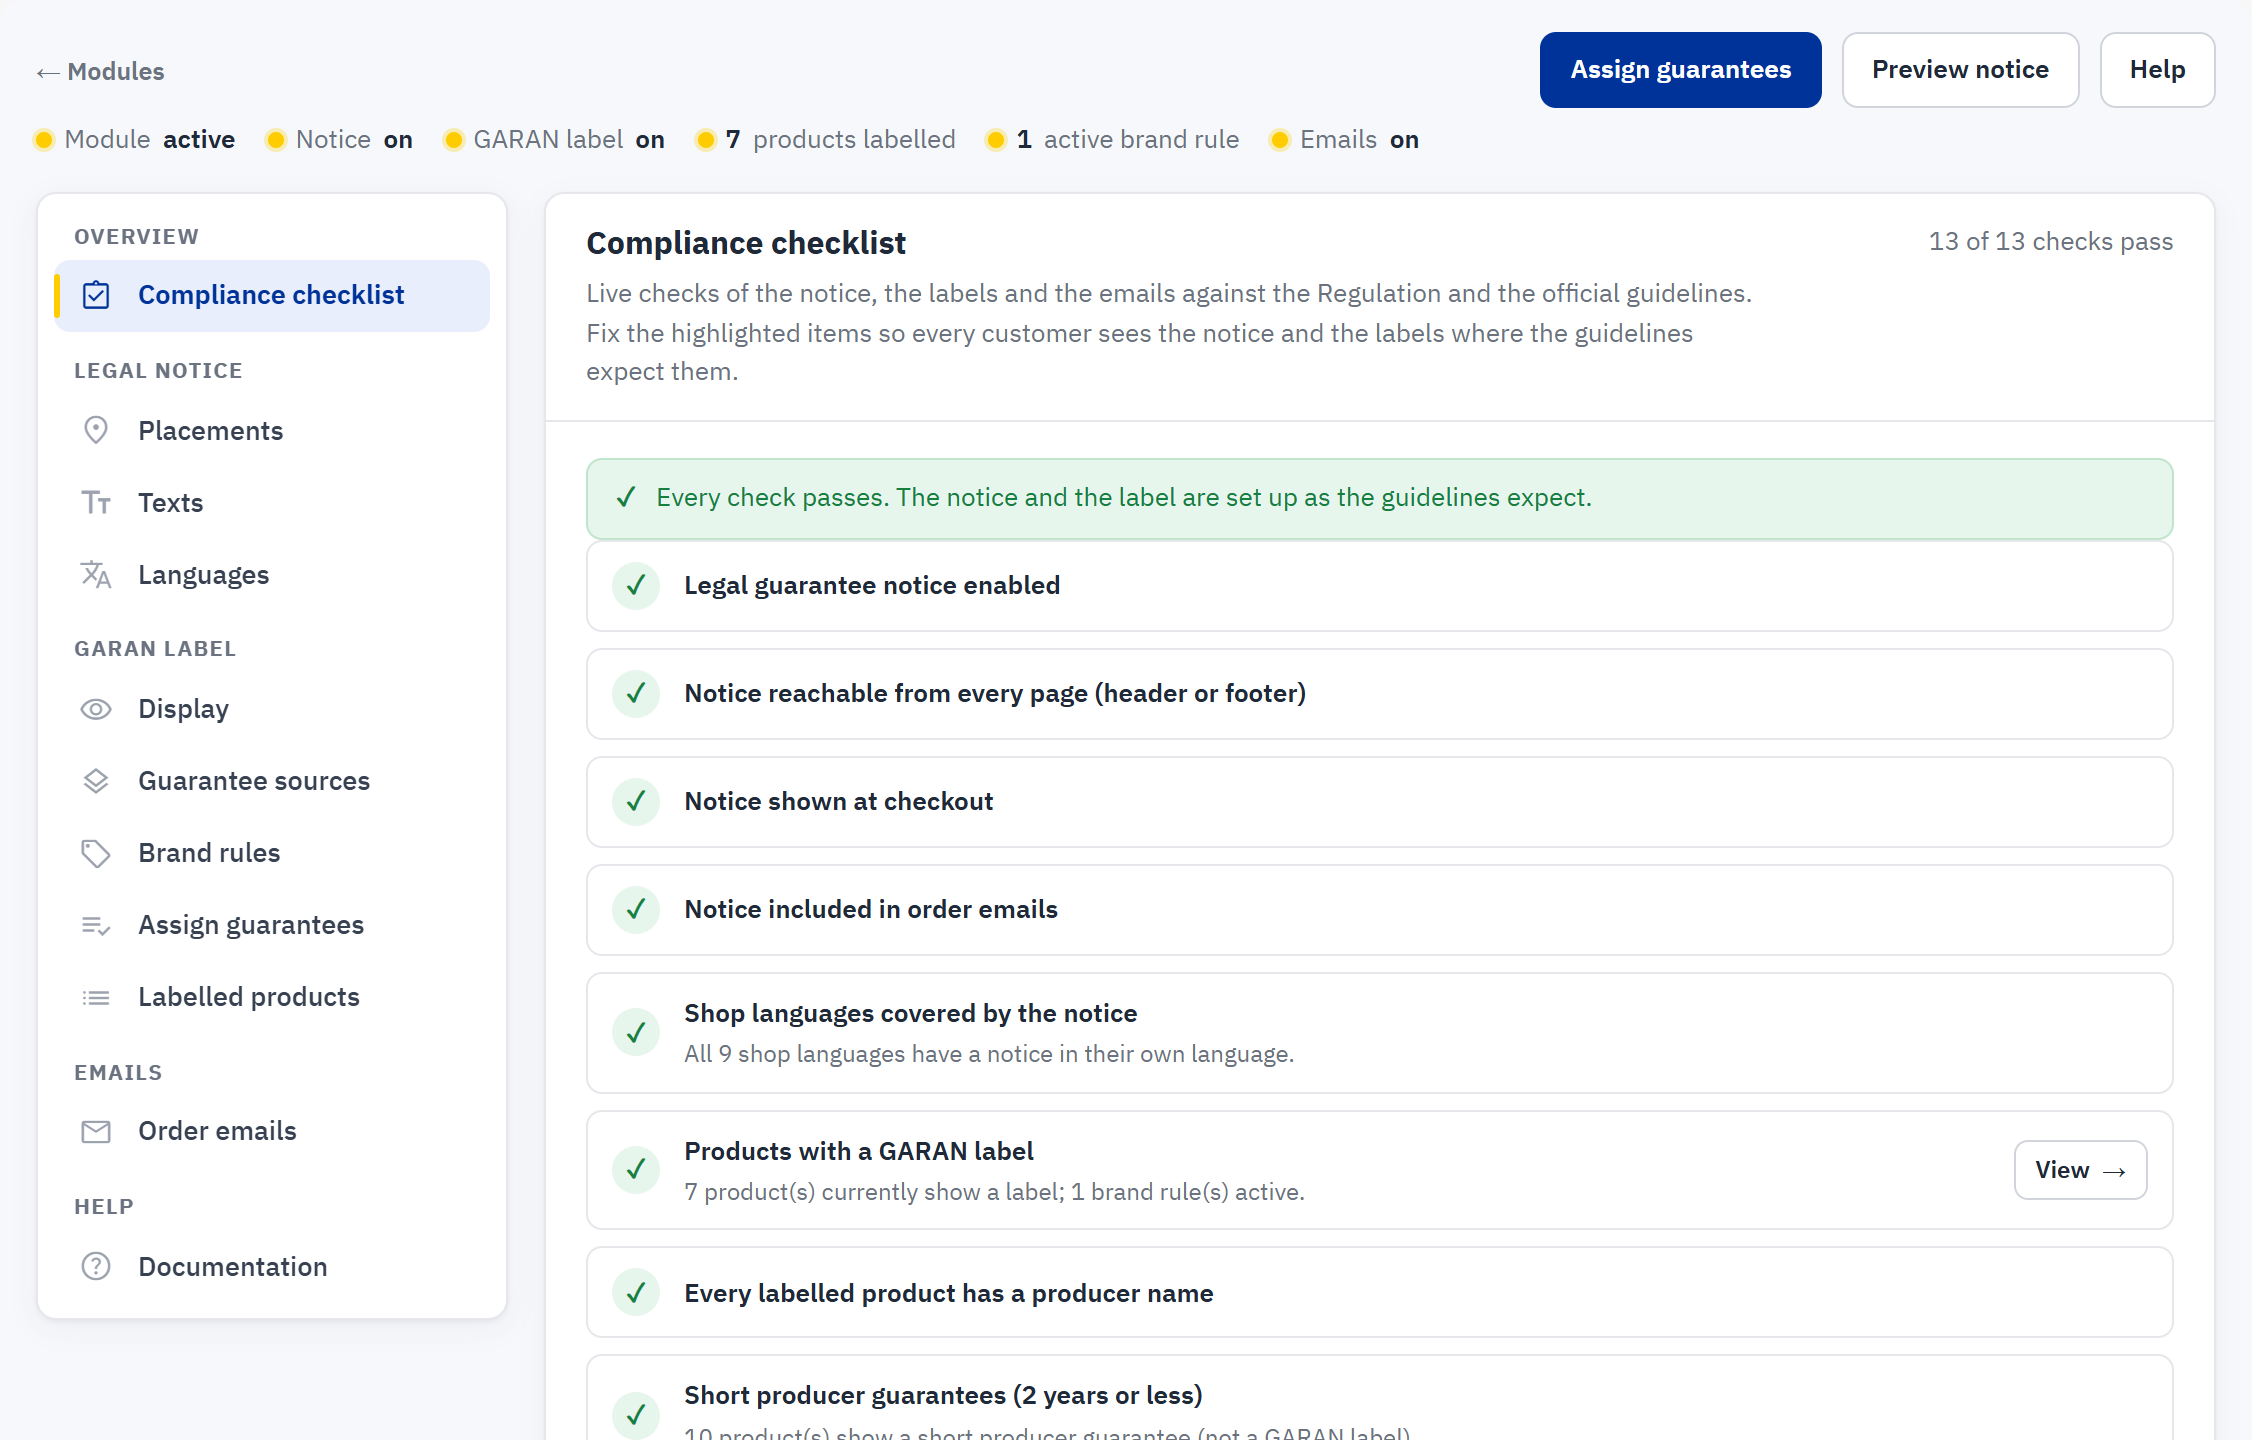
- Modules takes you back to the Module Manager.
- Assign guarantees opens the screen that gives many products a guarantee at once (Assign guarantees: many products at once).
- Preview notice opens the notice pop-up as your customers see it.
- Help opens the documentation section.
- The status line: a live summary of the module (see the table below).
- The navigation, grouped into Overview, Legal notice, GARAN label, Emails and Help.
- The open section. Each section has its own Save button at the bottom.
| Status line item | Meaning |
|---|---|
| Module active / inactive | Whether the module is enabled in this shop (Module Manager). |
| Notice on / off | Whether the legal guarantee notice is switched on (Legal notice › Placements). |
| GARAN label on / off | Whether the label is switched on (GARAN label › Display). |
| products labelled | How many products show a GARAN label right now, whatever the source of their guarantee. |
| active brand rules | How many brand rules give their products a label. |
| Emails on / off | Whether the notice or the labels are added to the order emails (Emails › Order emails). |
Good to know when you work on this page:
- Click a section in the navigation to open it. Save the section you changed before you open another one: each Save button saves its own section only.
- The i button next to a setting shows a short explanation.
- Sections with texts in several languages show language tabs at the top right (for example EN FR DE). Click a tab to edit the texts of that language.
- In a multistore installation, a blue note under the status line tells you which shops your changes apply to (Multistore).
Overview › Compliance checklist
The checklist is computed live each time you open the page. It is shown in The compliance checklist right after installation.. A line that fails comes with a hint and a Fix button that opens the right section.
| Check | What it watches |
|---|---|
| Legal guarantee notice enabled | The notice is switched on. Every seller in the EU must show it. |
| Notice reachable from every page (header or footer) | The header or the footer placement is on. |
| Notice shown at checkout | The checkout placement is on. |
| Notice included in order emails | The order emails get the notice as an image, a PDF or both. |
| Shop languages covered by the notice | Every shop language has a notice in its own language. Other languages get the default notice language; the hint names them. |
| Products with a GARAN label | Information: how many products show a label and how many brand rules are active. View opens the list. |
| Every labelled product has a producer name | A product with a guarantee but without a brand cannot show a label. The hint lists them. |
| Short producer guarantees (2 years or less) | Information: how many products have one and whether they are shown (Short producer guarantees). |
| PNG rendering available (GD with FreeType) | The server can draw the label images for emails (What GD with FreeType is used for). |
| Label cache directory writable | The module can store the rendered labels in img/eugaranlabel/. |
| Email templates accept the injection | Each email template the module handles has a place for the notice and the labels. |
| Guarantees from the product feature and Every value of the guarantee feature is understood | Only when a guarantee feature is chosen: how many products get a guarantee from it, and which values the module cannot read (A product feature as the source). |
Legal notice › Placements
Where the link to the notice appears in your shop, how it opens and how it looks.
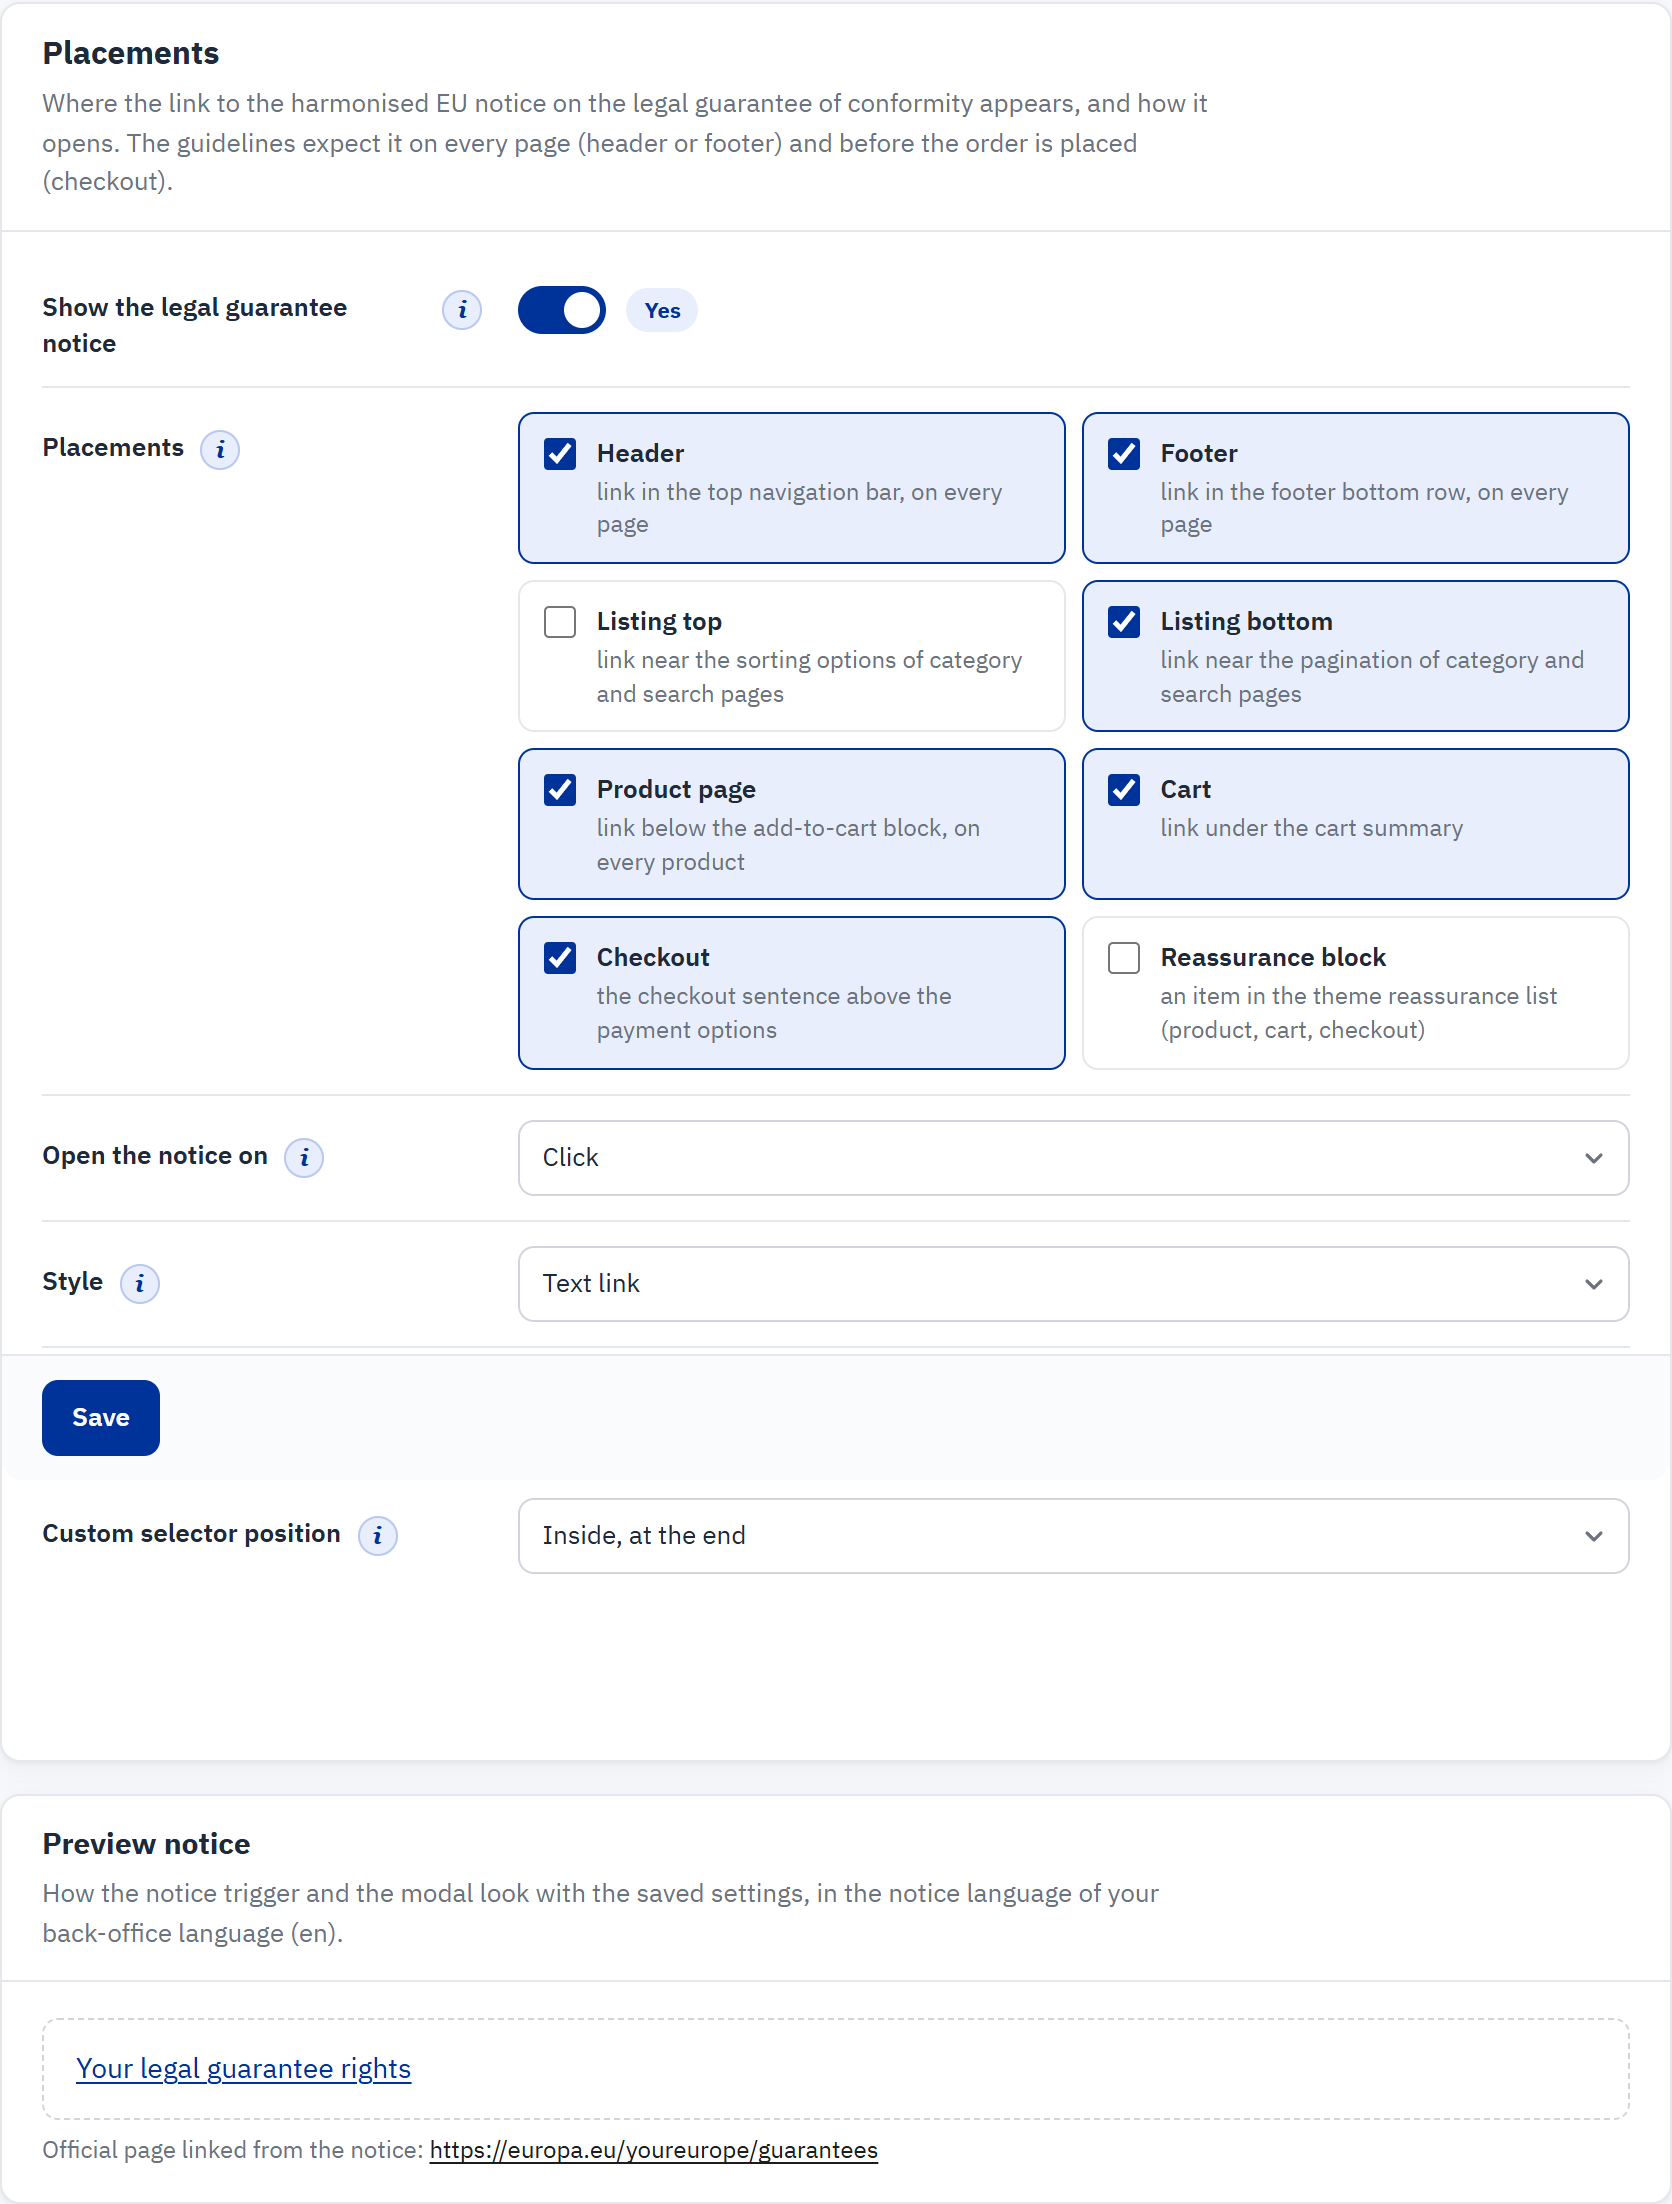
- Show the legal guarantee notice switches every placement and the email notice on or off at once.
- Placements: tick every place where the link should appear.
- Open the notice on: Click, or Click or hover.
- Style: Text link or Button.
- Custom selector and Custom selector position: an extra link anywhere in your theme.
- Save stores the section.
- Preview notice: the link as it looks with the saved settings. Click it to open the pop-up.
| Placement | Where the link appears | Default |
|---|---|---|
| Header | In the top navigation bar, on every page | On |
| Footer | In the bottom row of the footer, on every page | On |
| Listing top | Near the sorting options of category and search pages | Off |
| Listing bottom | Near the pagination of category and search pages | On |
| Product page | Below the add-to-cart block, on every product page | On |
| Cart | Under the cart summary | On |
| Checkout | As the sentence “Please check your legal guarantee rights before buying” above the payment options | On |
| Reassurance block | As an item in the theme’s reassurance list (product, cart and checkout pages) | Off |
- Open the notice on: with Click or hover, the pop-up also opens after the mouse rests on the link for a moment. On phones and tablets it always opens with a tap. The setting also applies to the nested GARAN labels.
- Style: a Text link takes the look of your theme’s links; a Button is a small EU-blue button.
- Custom selector: for themes that place things differently. Type the CSS selector of an element of your theme, for example
#footer .links, and choose where the link goes: Before the element, After the element, Inside, at the start or Inside, at the end. Leave it empty if you do not need it (The custom selector (no template change)).
Legal notice › Texts
The two texts of the notice link that you can change, in every language of your shop.
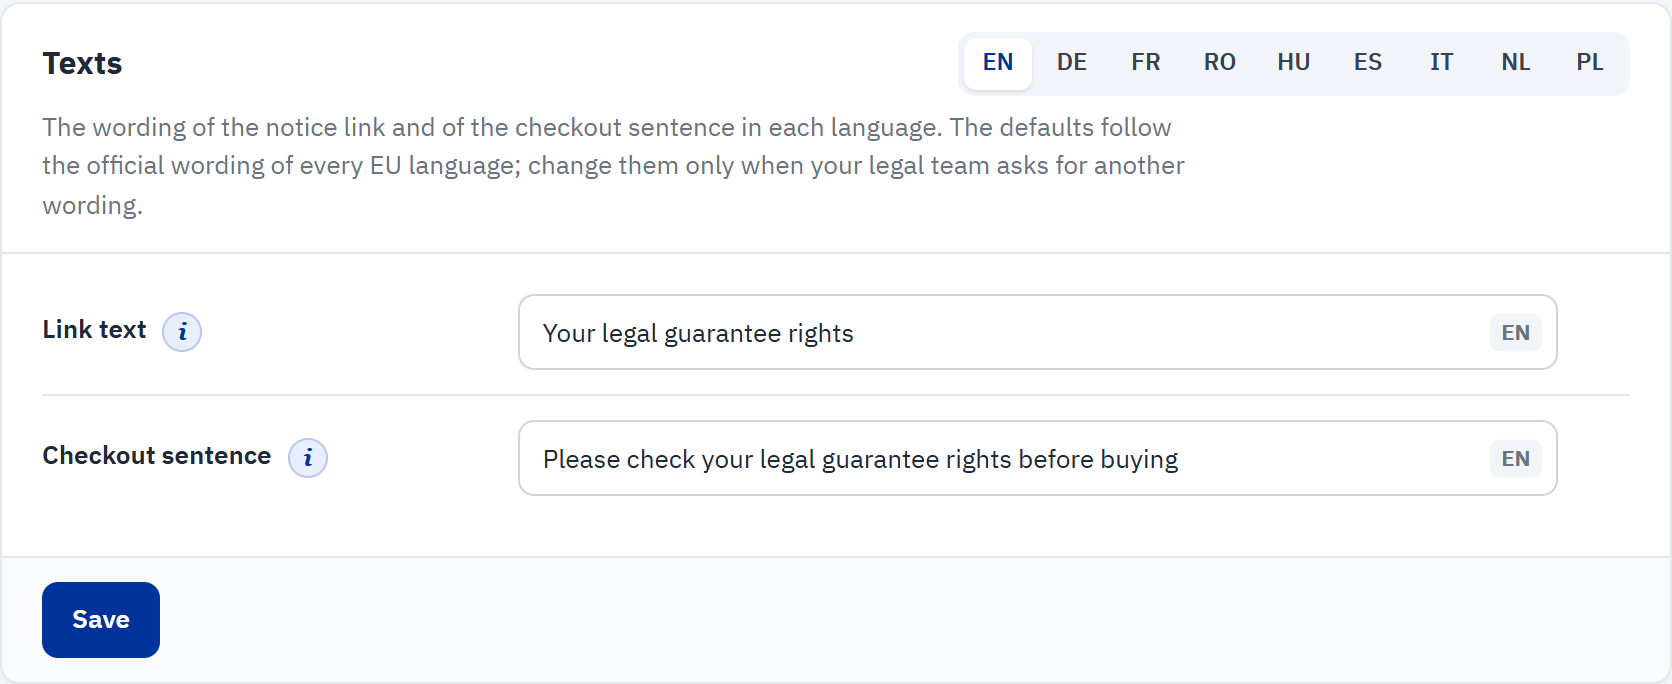
- The language tabs: click a language to edit its texts.
- Link text, shown in the header, the footer, the listings, the product page and the cart.
- Checkout sentence, shown above the payment options.
- Save stores the texts of every language.
The fields come pre-filled with the official wording of each EU language, for example “Your legal guarantee rights” and “Please check your legal guarantee rights before buying”. Change them only if your legal team asks for another wording, and keep them short. An empty field shows the official wording again.
Legal notice › Languages
The notice exists in the 24 official EU languages. Each shop language gets the notice in its own language automatically; this section lets you choose another one.
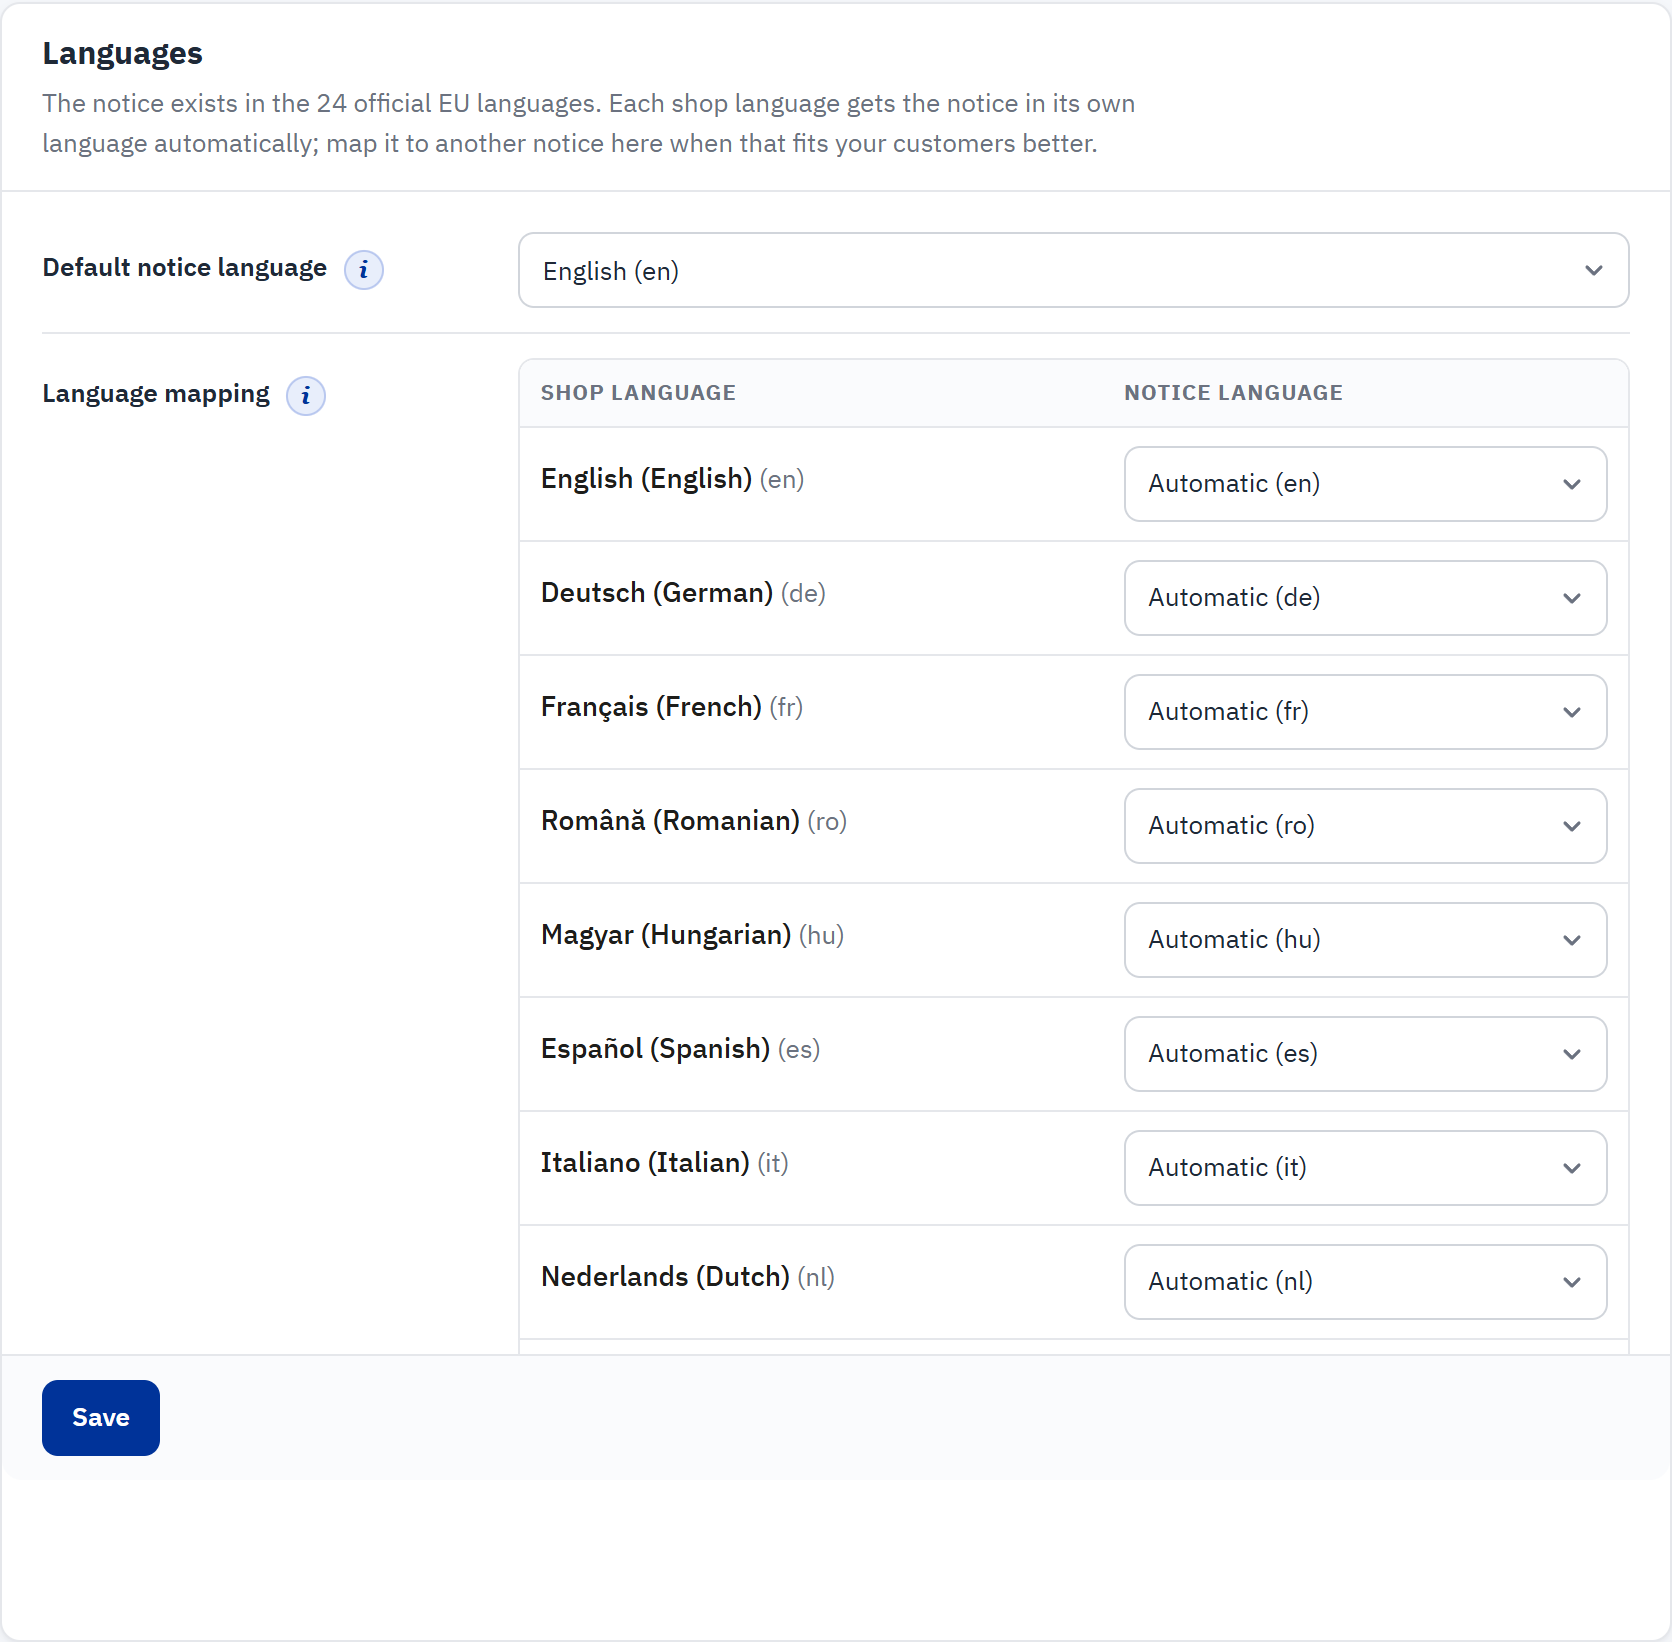
- Default notice language: used for shop languages that are not EU languages and have no mapping.
- Language mapping: the notice each shop language gets. Automatic means the notice in the same language.
- Save stores the mapping.
- Regional PrestaShop languages get the notice of their language automatically: British English, Brazilian Portuguese, the Latin American Spanish languages, Swiss German, Canadian French, and Slovenian (PrestaShop code “si”).
- A shop language outside the EU languages, for example Ukrainian or Norwegian, gets the default notice language (English after installation). The checklist names such languages. Map them here if another notice suits your customers better.
- The Your Europe link always matches the notice language shown.
GARAN label › Display
Where the label appears, and what it prints when a product has no brand or model text of its own.
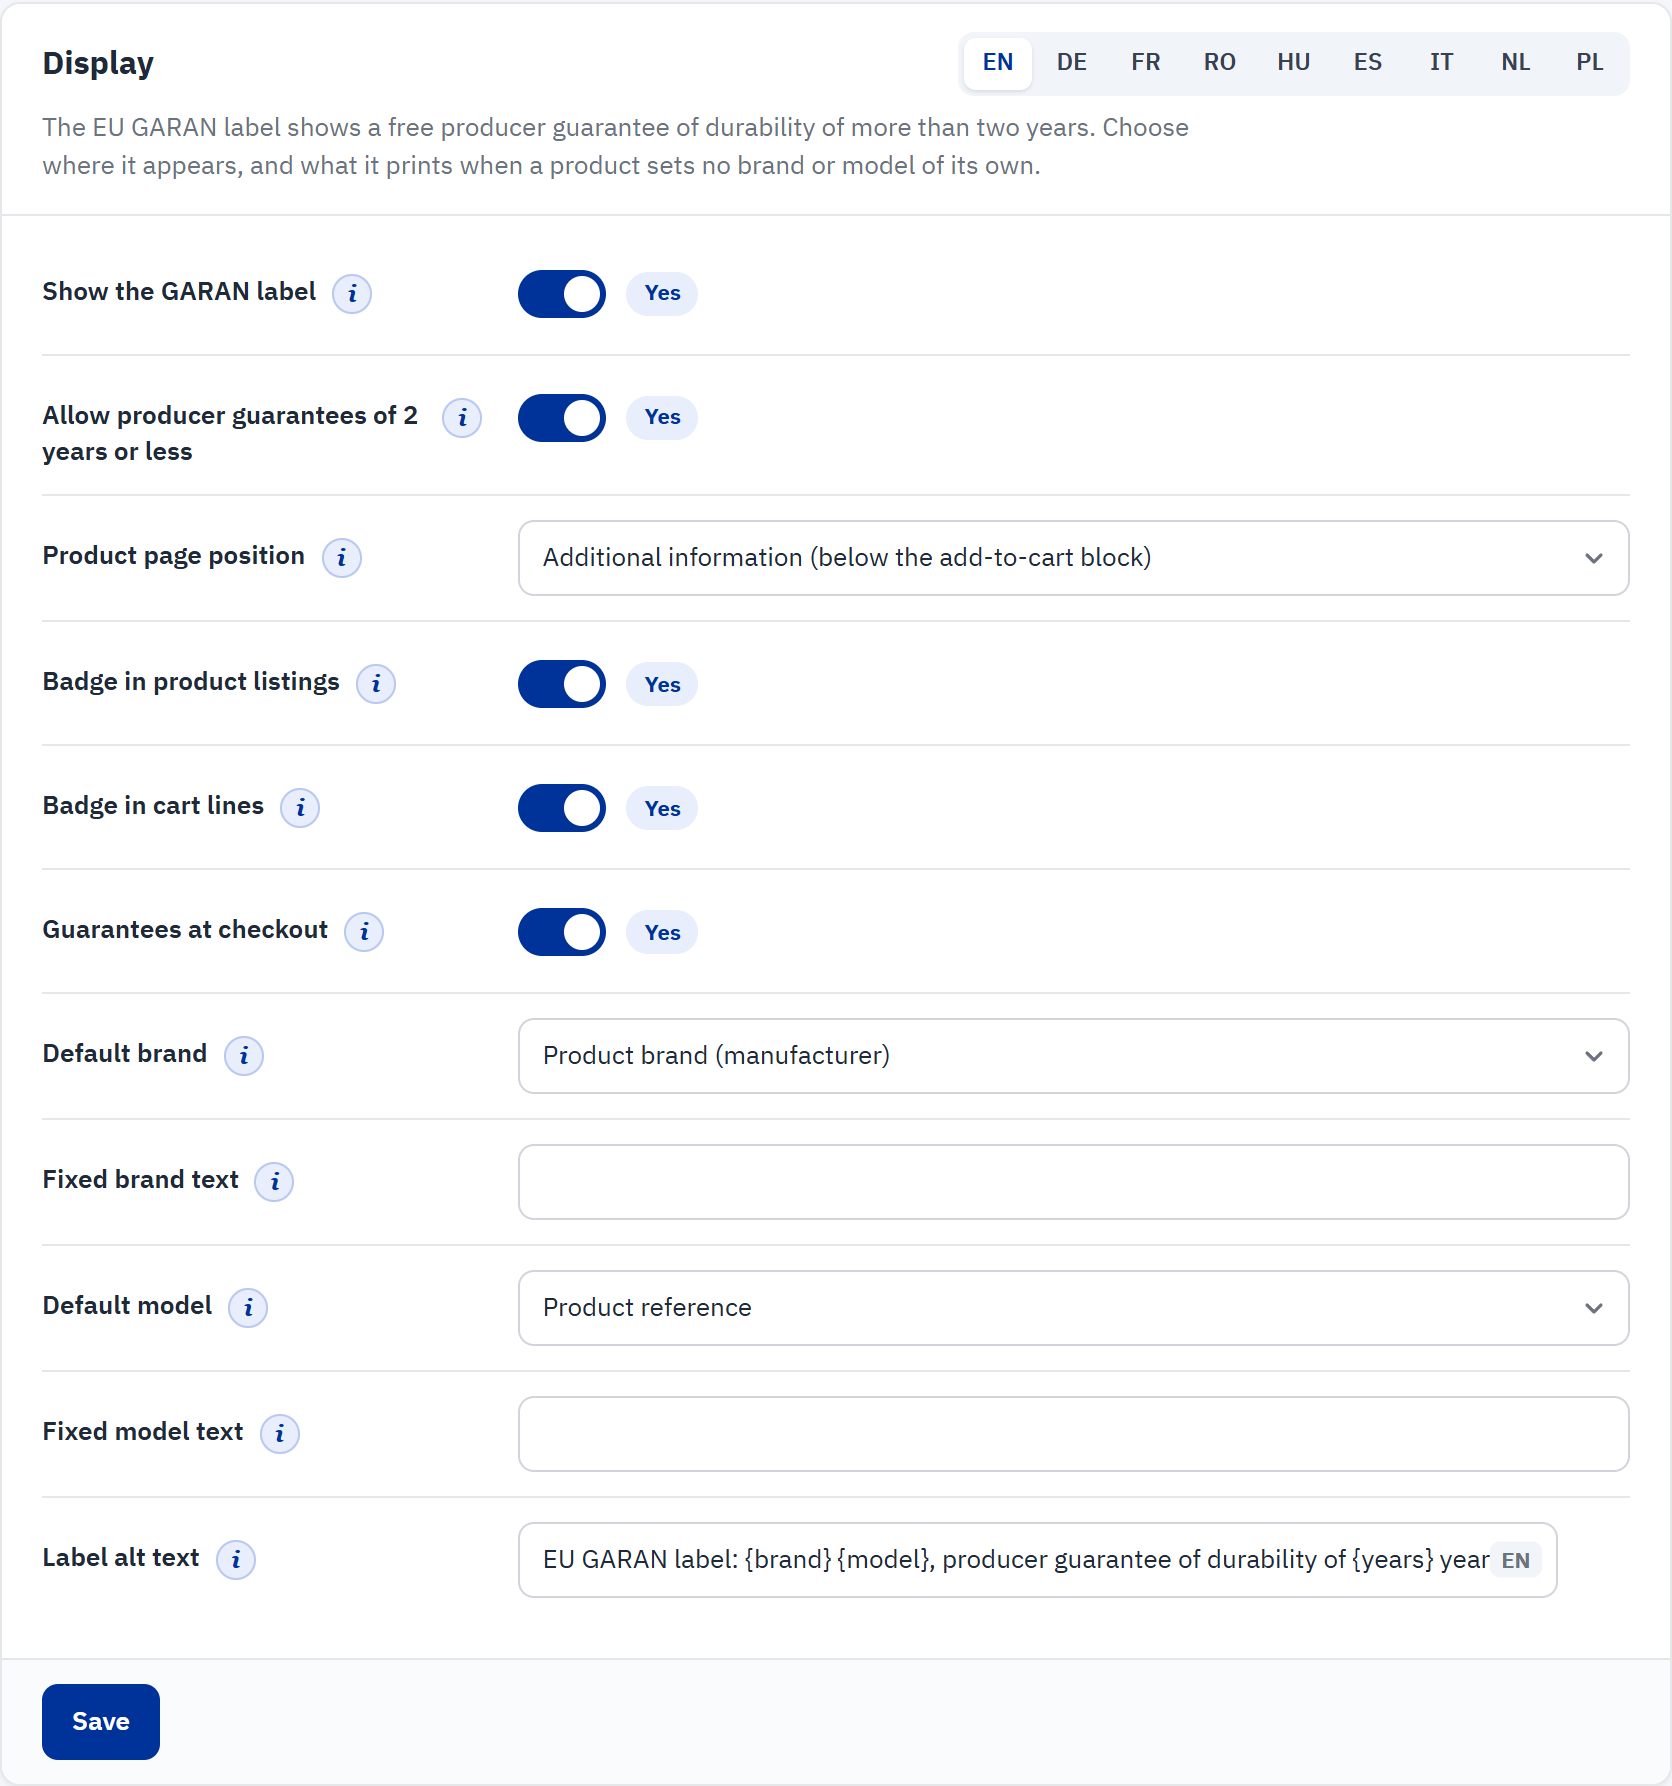
- Show the GARAN label switches every label placement and the labels in emails on or off at once.
- Allow producer guarantees of 2 years or less: off by default, see Short producer guarantees.
- Product page position: where the full label appears on the product page.
- Badge in product listings, Badge in cart lines and Guarantees at checkout.
- Default brand and Fixed brand text: the producer name printed on the label.
- Default model and Fixed model text: the model identifier printed on the label.
- Label alt text: the text read by screen readers, per language.
- The language tabs of the alt text.
| Product page position | Where the full label appears |
|---|---|
| Additional information (below the add-to-cart block) | Under the add-to-cart button, together with the notice link (default) |
| Below the product images | Directly under the image gallery |
| Reassurance block | Inside the theme’s reassurance block |
| Product footer | Below the product description tabs |
| Do not show on the product page | Only the other placements are used |
- Badge in product listings: the nested label on product cards of category pages, search results and featured products. It opens the full label on click (or hover).
- Badge in cart lines: the nested label and “Producer guarantee: 5 years” under each labelled product in the cart.
- Guarantees at checkout: the block “Guarantees for the products in your order” on the payment step, which the guidelines ask for “directly before the order is placed”.
- Default brand: Product brand (manufacturer), or Fixed text below. The label must name the producer who offers the guarantee, so use a fixed text only when every labelled product comes from the same producer.
- Default model: Product reference, Product name, MPN or Fixed text below. When the chosen field is empty for a product, its name is used.
- Label alt text: may contain
{brand},{model}and{years}, which are replaced for each product.
Under the settings, the Label preview shows how the label looks, and the Rendered label cache card keeps the image files in order.
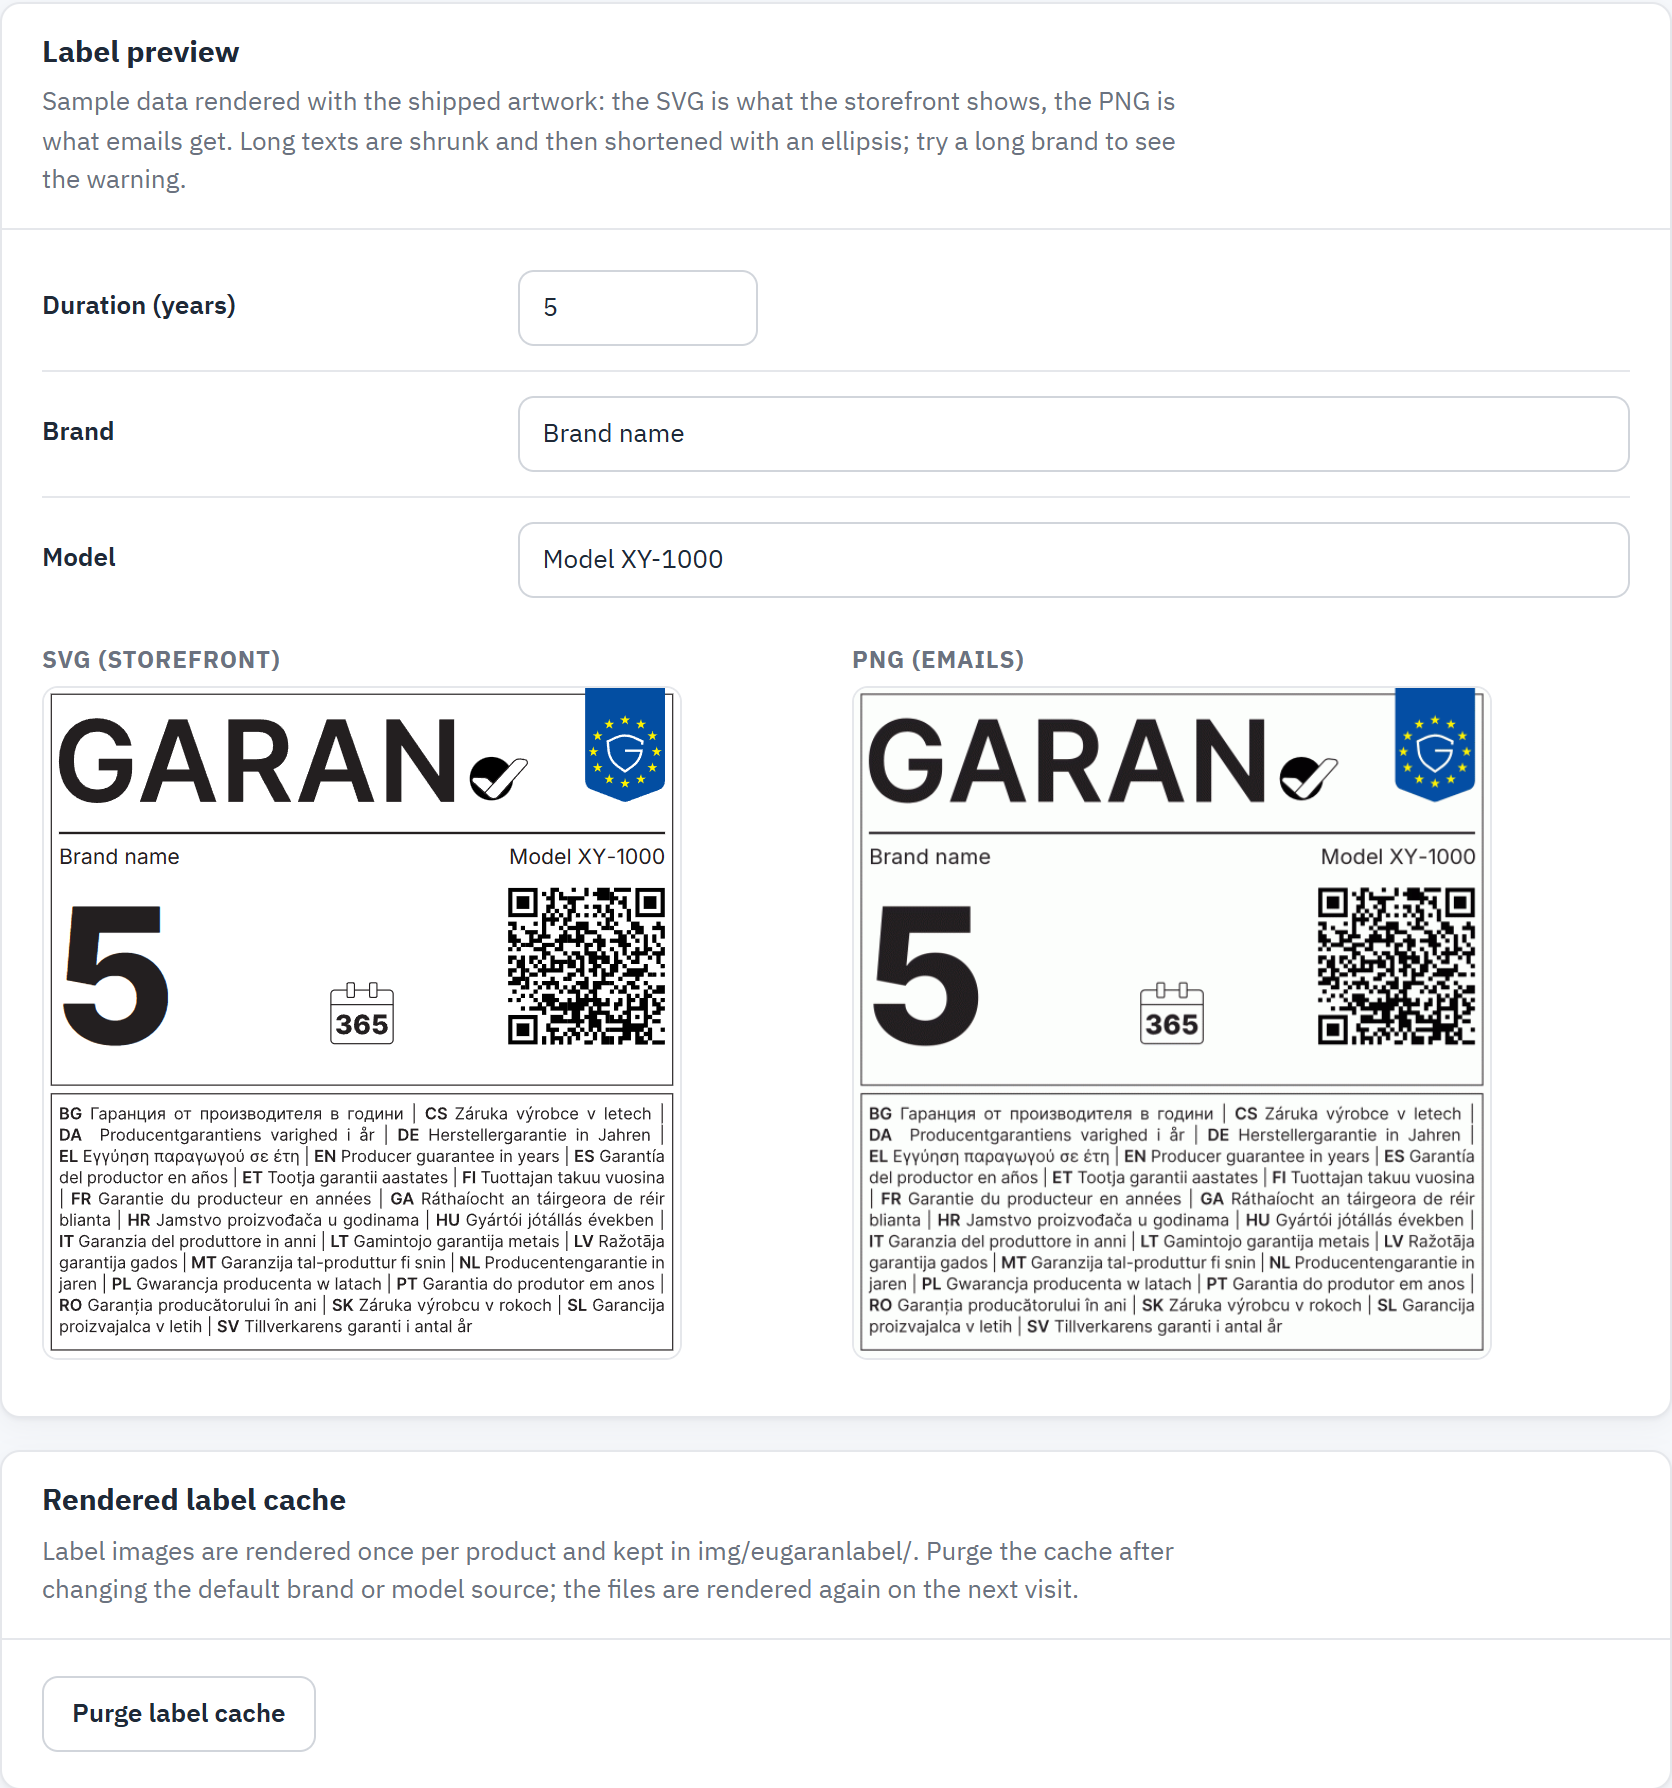
- Sample values: change the duration, the brand or the model to try them.
- SVG (storefront): the vector image your shop shows.
- PNG (emails): the image the order emails get.
- Purge label cache deletes the rendered images; they are drawn again when needed.
A long brand or model text is made smaller, then shortened with an ellipsis, so that the label keeps its official proportions. The preview warns you when that happens; prefer the short form the producer uses. Purge the label cache after you change Default brand or Default model.
GARAN label › Guarantee sources
This section decides where the module reads the guarantee of each product: its own setting, a product feature of your catalogue, or its brand rule. It also shows how the values of the feature are read. Everything about it is in Which source wins and A product feature as the source.
GARAN label › Brand rules
A brand rule gives every product of a brand the same producer guarantee, unless the product has its own setting or a guarantee feature value.
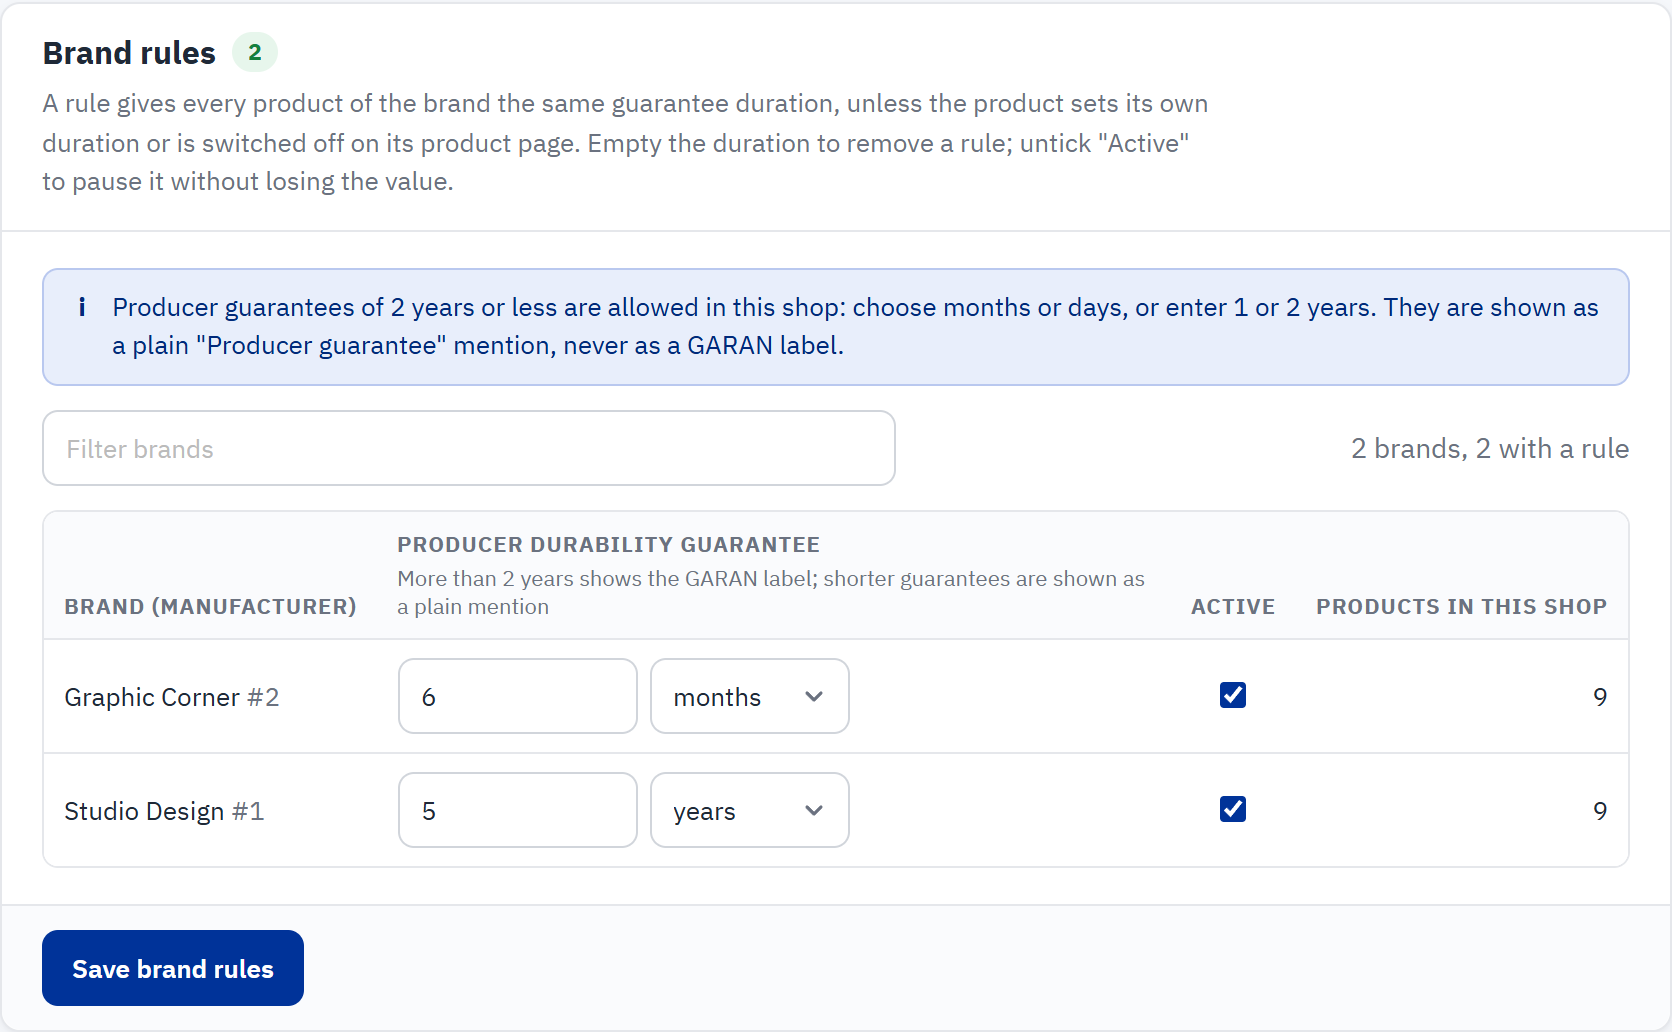
- Shown while producer guarantees of 2 years or less are allowed.
- Filter brands finds a brand by name.
- Producer durability guarantee: the duration, and its unit while short guarantees are allowed.
- Active: untick it to pause a rule without losing its value.
- Products in this shop: how many products the rule covers.
- Save brand rules stores every row.
- Enter the guarantee next to the brand, in whole or half years from 2.5 to 99 (for example
5or2.5). - Keep Active ticked.
- Click Save brand rules.
To remove a rule, empty its duration and save. To pause it, untick Active and save. Fill in a rule only if the producer offers more than 2 years on all products of the brand.
GARAN label › Assign guarantees
A two-pane screen to give many products a guarantee at once: choose a category, select products, enter the guarantee, apply. The top bar’s Assign guarantees button opens it too. See Assign guarantees: many products at once.
GARAN label › Labelled products
Every product with a producer guarantee, from any source, and every product whose label is switched off.
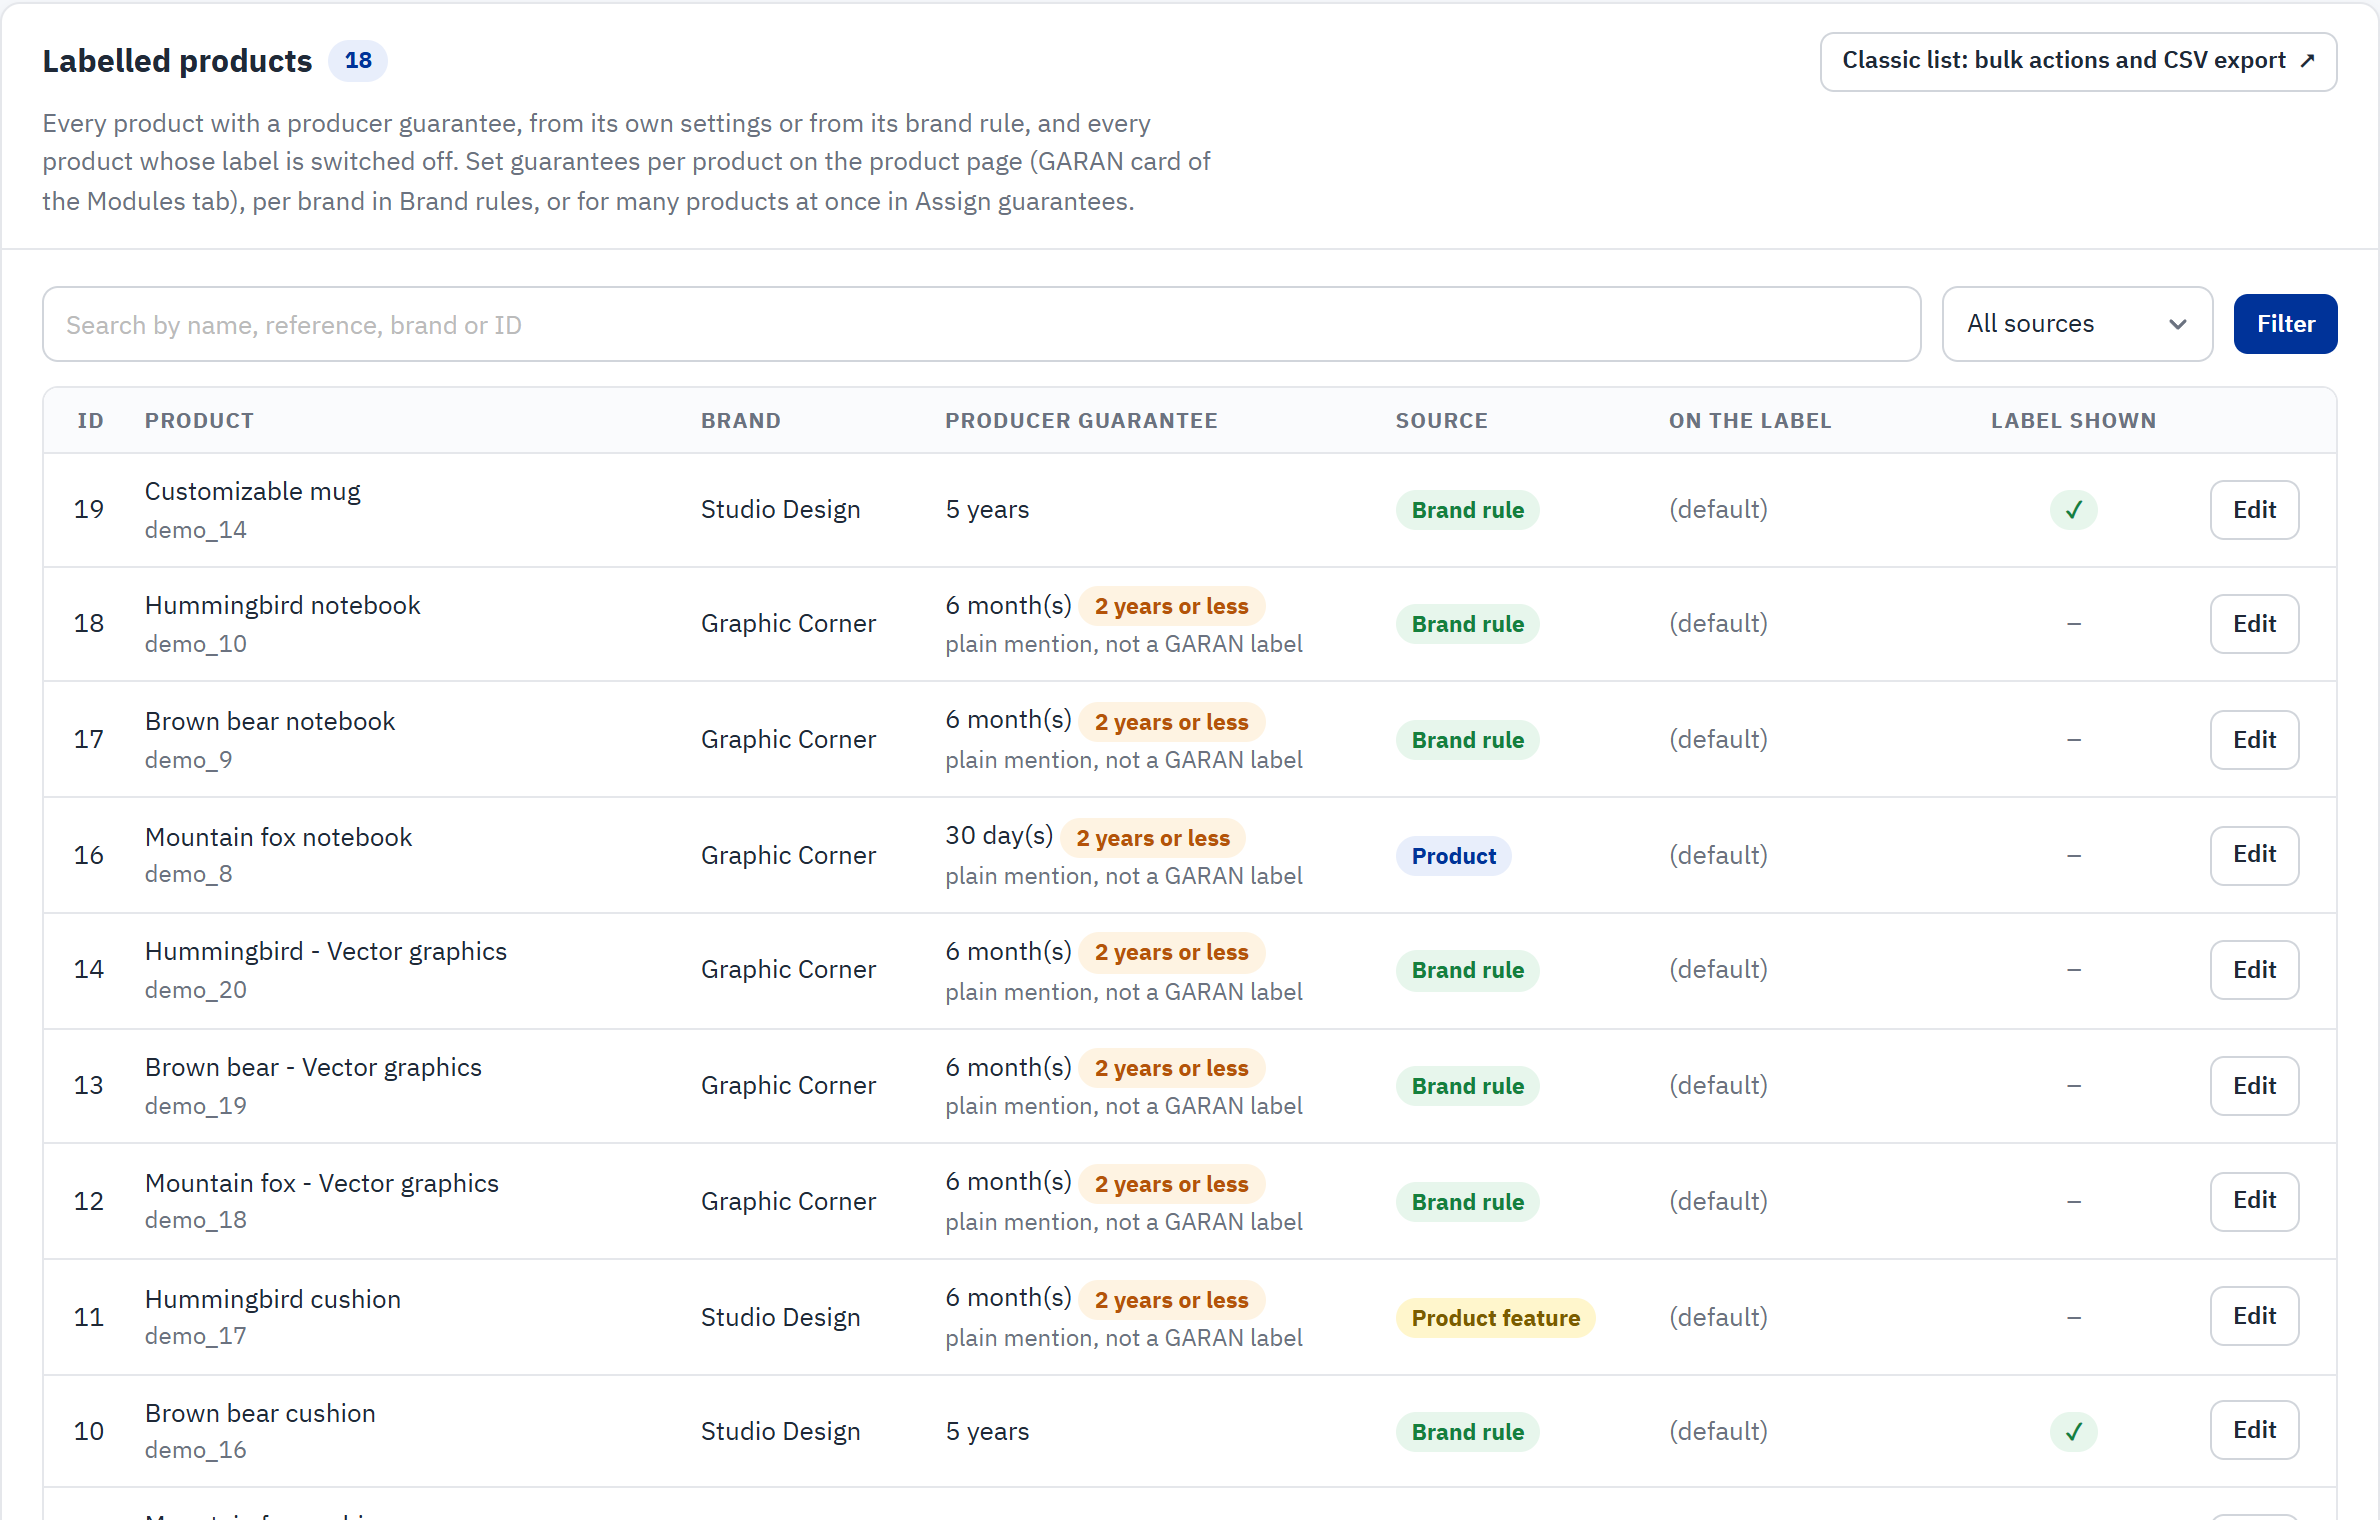
- Classic list: bulk actions and CSV export opens the same list as a standard PrestaShop list.
- Search by name, reference, brand or ID, and filter by source. Click Filter.
- Source: Product, Product feature, Brand rule or Switched off.
- A guarantee of 2 years or less is marked and shown as a plain mention, never as a label.
- Label shown: a tick when the product shows the GARAN label.
- Edit opens the product page.
The On the label column shows the brand and model texts set on the product; (default) means the defaults of the Display section are used. No brand: no label marks a product that has a guarantee but no producer name to print.
The classic list offers bulk actions on the selected products (Set guarantee duration..., Enable label, Disable label) and the export button of PrestaShop lists, which downloads the list as a CSV file.
Emails › Order emails
The notice and the labels in the order confirmation email.
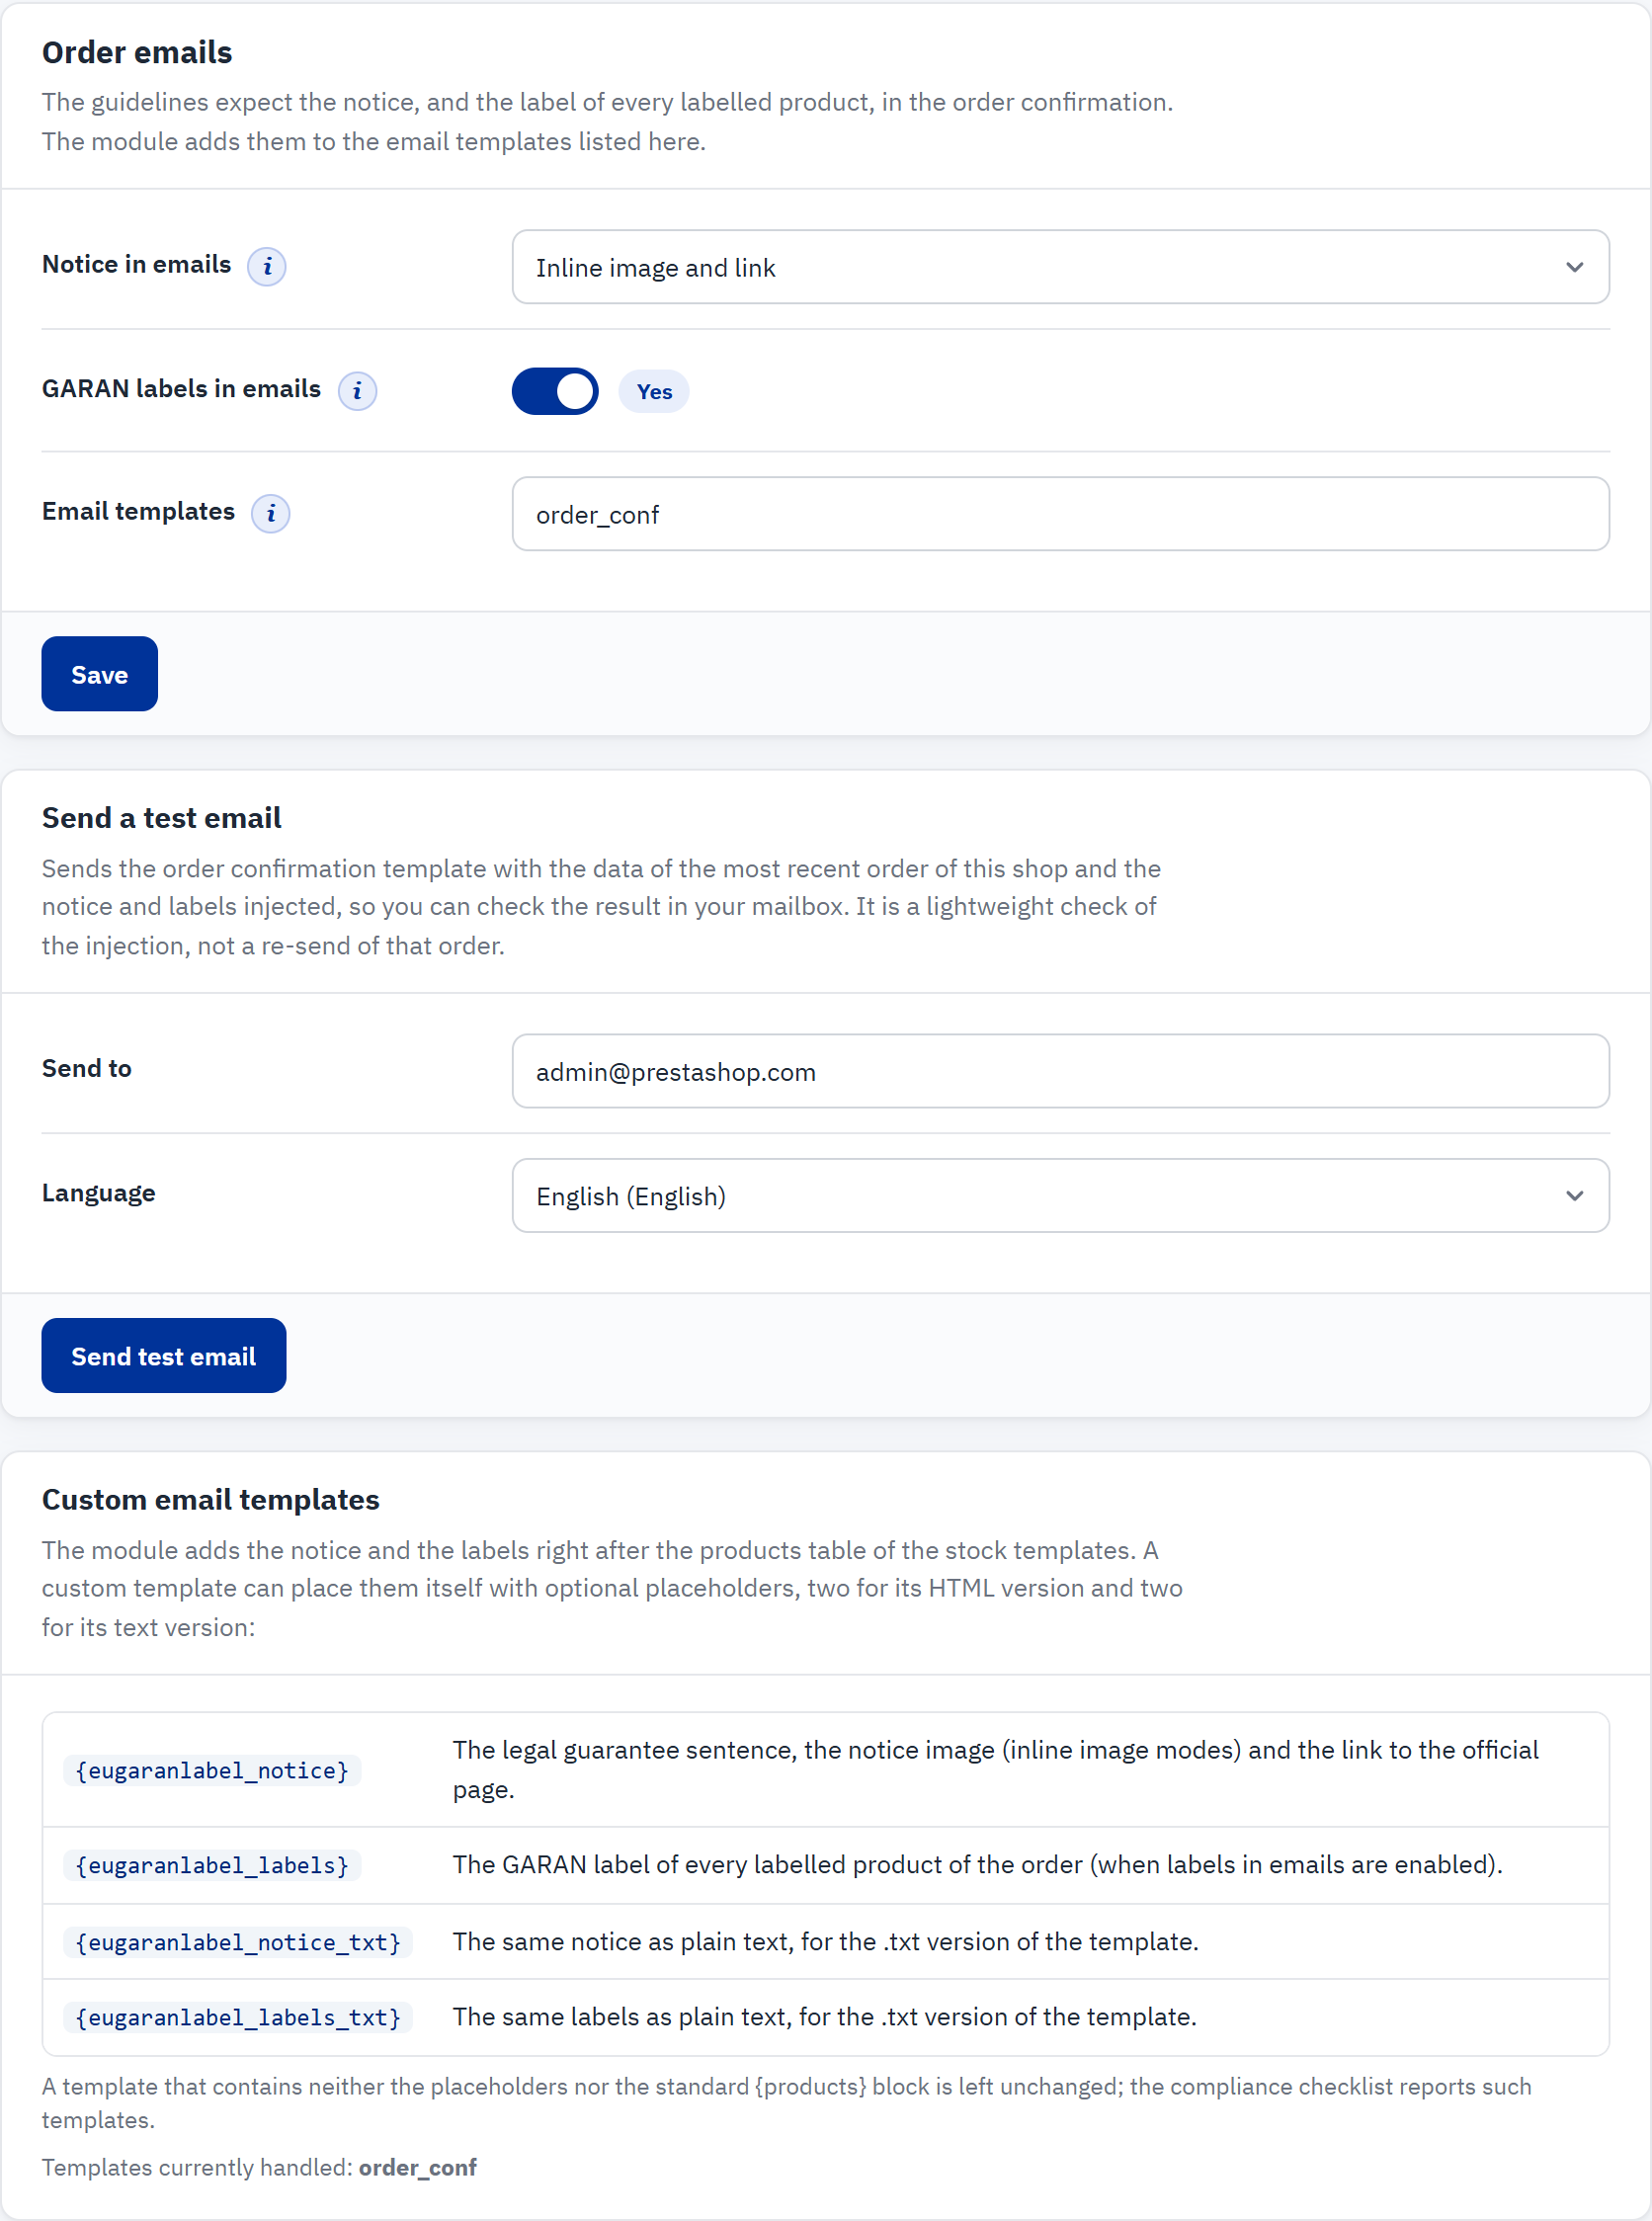
- Notice in emails: how the notice is added.
- GARAN labels in emails: adds the label of every labelled product of the order.
- Email templates: the email templates the module adds them to.
- Send to and Language of the test email.
- Send test email sends the order confirmation with the notice and labels.
- The placeholders for custom email templates.
| Notice in emails | Result |
|---|---|
| Not added | No notice in the emails (the checklist warns you) |
| Inline image and link (default) | A sentence, the notice image and the Your Europe link |
| PDF attachment | The official notice PDF in the customer’s language, attached to the email |
| Inline image, link and PDF attachment | Both |
- Email templates: template names separated by commas; after installation
order_conf, the order confirmation. Add the name of a customised copy if your shop sends one. Leave the field empty to switch the email integration off. - Send a test email uses the most recent order of the shop to find products and labels. It checks the layout; it is not a copy of a real confirmation. The button stays disabled until the shop has at least one order.
- The standard order confirmation needs no change: the notice and the labels come right after the products table. For custom templates, see Custom order confirmation templates.
Help › Documentation
A short reference inside the back office: when the GARAN label may be used, what to do and what to avoid, where the notice and the labels are shown, the email placeholders, languages, links to the official texts, and the licences.